How To Add A Donation Page
Many of the website templates already include a default "cash" donation page although this may not suit your needs; in this guide, we will go over How To Add A Donation Page to any Auctria website.
When you first start with Auctria, one of the things you will need to do is create a website for your event. This will provide you with the basics for your fundraiser's online needs.
This will also provide your guests a place to find you on the internet and, in this case of How To Add A Donation Page, be able to make donations to your fundraiser.
Pre-Requisites
- Auctria Auction Website (see How To Create A New Event Website if needed)
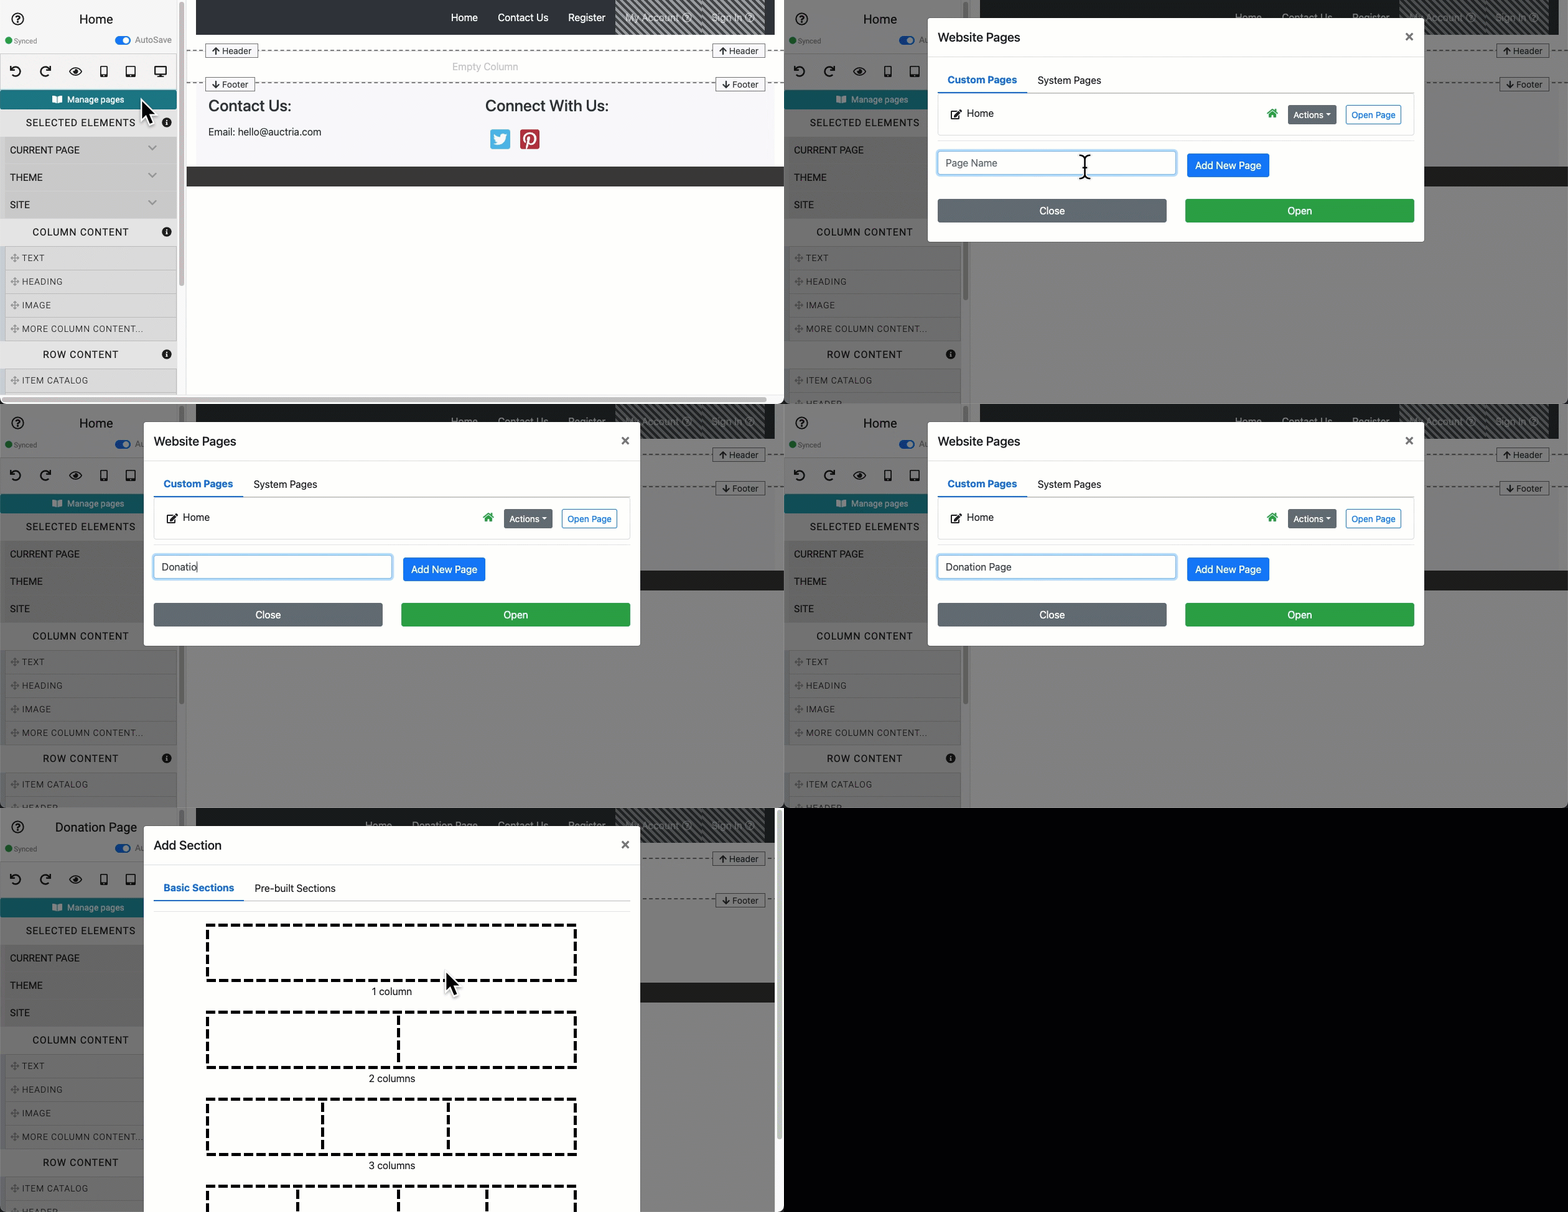
In many cases, a new "Donation Page" will start by Adding A New Page to the auction website. To add a new page, start by opening the auction website in edit mode.
In the Website Editor Sidebar you will find, near the top of the sidebar, the Manage Pages bar. Click on this and scroll down in the pop-up window, if necessary, to find the Add New Page feature at the bottom of the pop-up window.
Type the name of your "Donation Page" into the text field and click on the Add New Page button. This will start the process of adding a new page to the auction website and automatically add a menu entry for the page at the end of the displayed page links. (See "Configure Menu Entries" to change this order as needed.) As part of the new page creation process you will have the option to use a "Pre-built Section" and in this case there is a pre-built section for a "Cash Donation" with a progress tracker (thermometer) available.
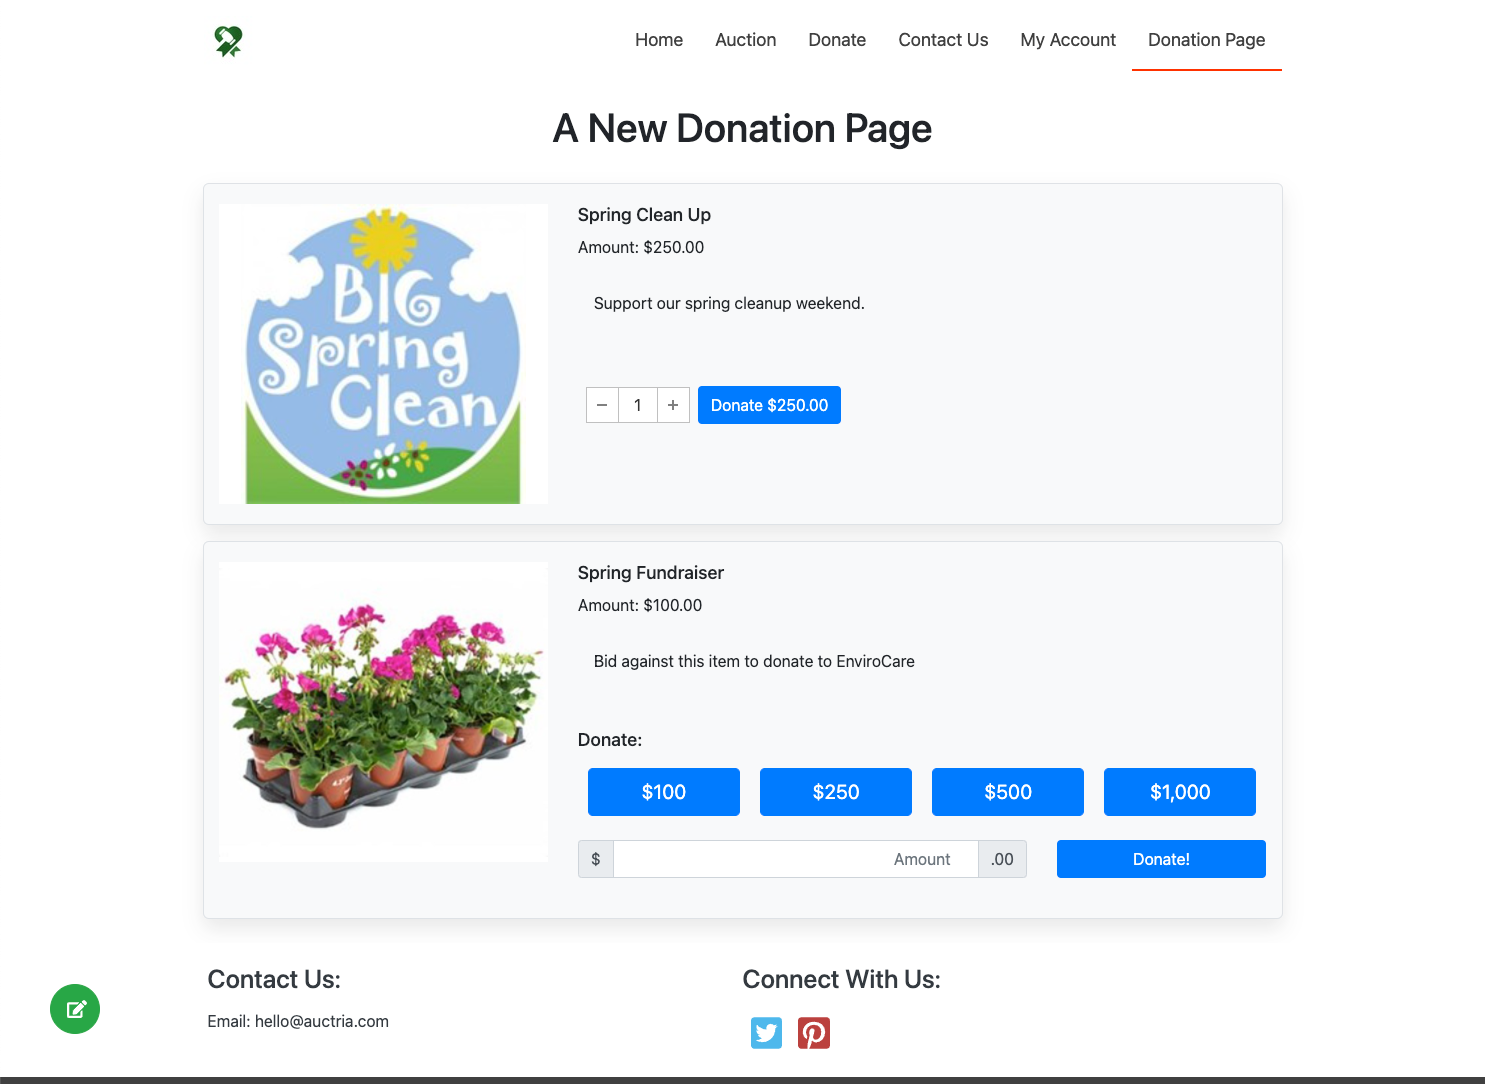
If all you need is a "Cash Donation" and a tracker for it on the page, you're all done! Now, if you are looking for something more complex such as a Donation Page with multiple projects you are trying to fund with your fundraiser and you want to ensure each donation pledge is properly associated with its project you will need to do more... this often is done most easily by starting with a "blank" page.
When you start the Add New Page process you could simply stick with the "Basic Sections" tab and select the "1 column" option. This will create a simple page for the auction website which you will need to fill in. You can come back to this page and update it at any time.
Add New PageWebsite Editor Sidebar
In many cases, especially if you are having a single event raising funds for multiple projects, you will need to create Donation items to highlight each project and allow your donating bidders the option to choose the project, or projects, they would like to help fund.
Donation items are made by creating new items with the Donation item type. For more information on creating Donation items, please read the following pages in the User Guide:
Once you have your Donation Items created and ready to be offered to your guests, return to that "Donation Page" you created where we will add a Donation Element using the "Donation Items Mode" and these items you just created.
Add New Items to AuctriaDonation Items
Donation Element
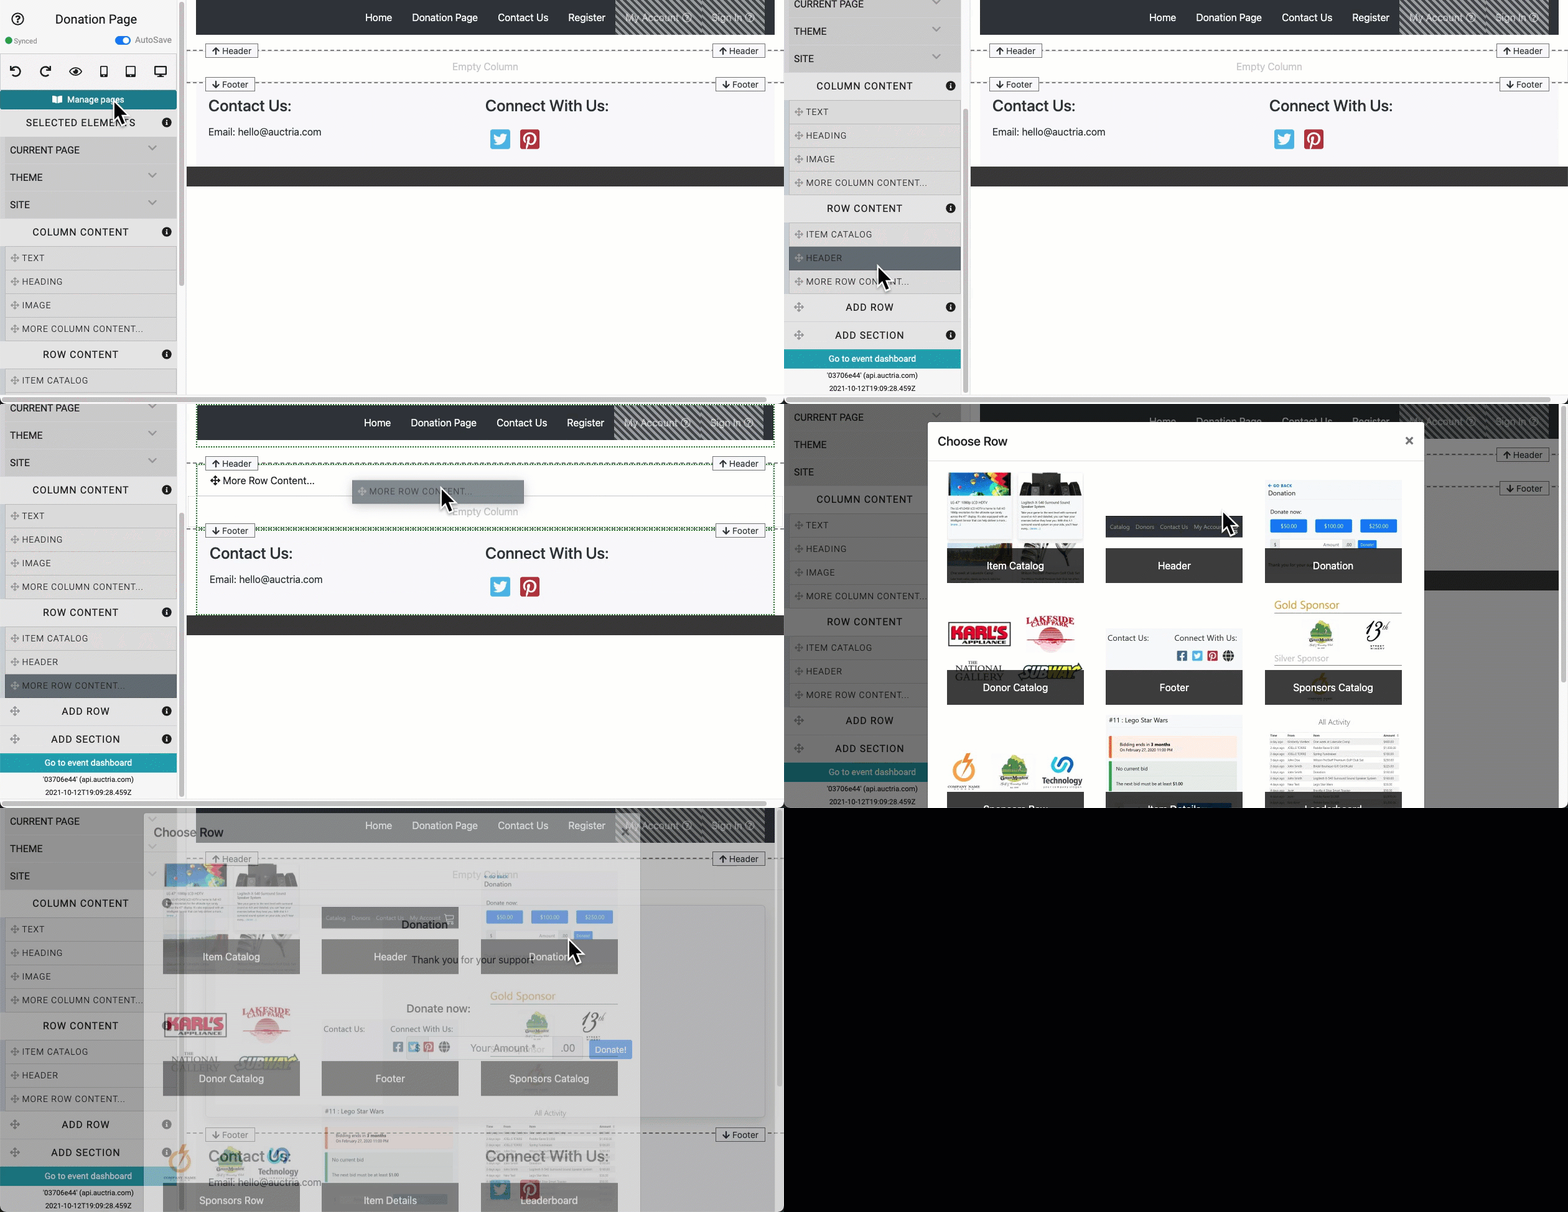
Although this is about How To Add A Donation Page you can add Donation Elements to any page... or have multiple instances of Donation Elements across several pages on your auction website.
You can also add your new Donation Items to your auction catalog, too, please see How To Display Donations Type Items in the User Guide for more information on this approach.
To add a Donation Element to a page you may need to add a new Row Element although if we are following from the processes above you can drag-n-drop the Donation element into the empty Row/Column that was created when you added the new page to the website.
This will actually add a row (either above or below) the existing empty row/column just make sure to drag the Donation element onto the existing column and then drop it when you see the new row appear. Dropping the element below is relevant in this case although empty rows/columns are not displayed to auction website visitors.
Once you have inserted the Donation element it will default to the "Cash Donation Mode". If you are going with the "Donation Items Mode" you will need to edit the Donation element and change its "Donation Mode" setting to "Donation Items".
Donation ElementDonation Items
Add New Row
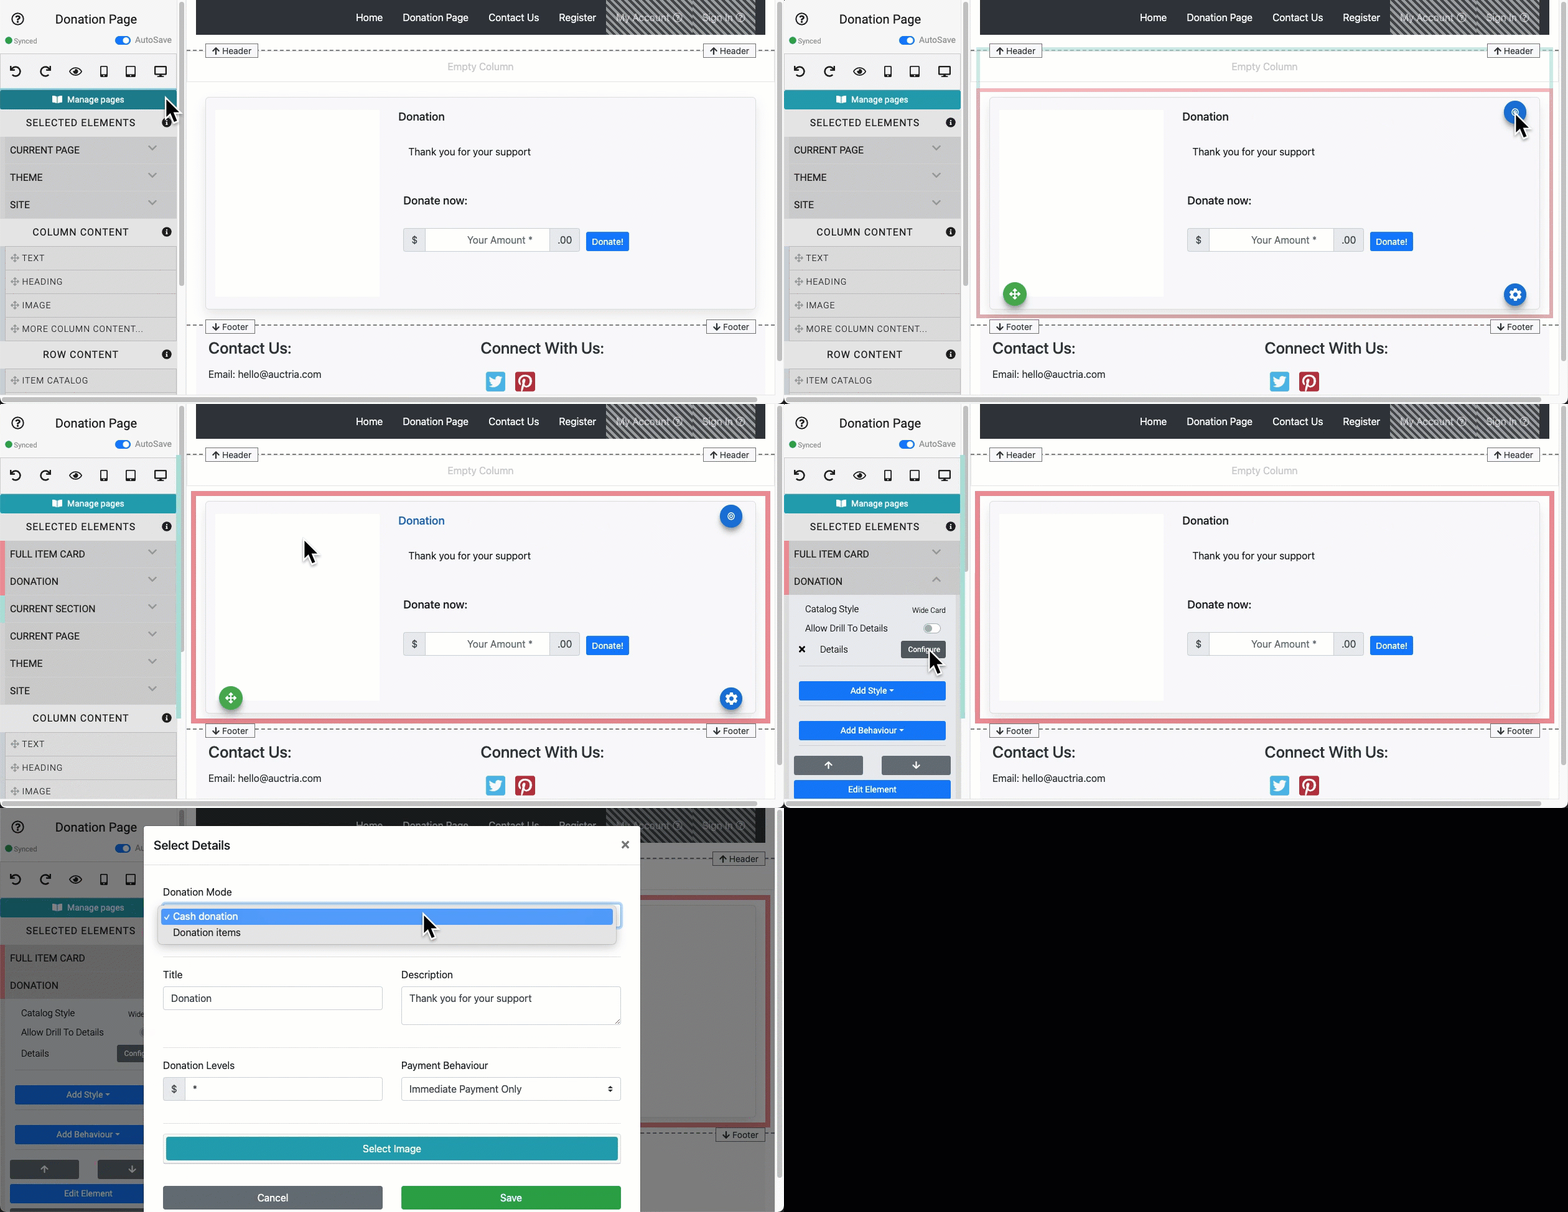
To change the Donation element to "Donation Items" mode, edit the Donation Element in the pop-up window and change the drop-down selector to "Donation Items". You can now select the Donation Items you created earlier for the projects you want to fund. You can select a single item, or multiple items, each is added individually to the element in the pop-up window.
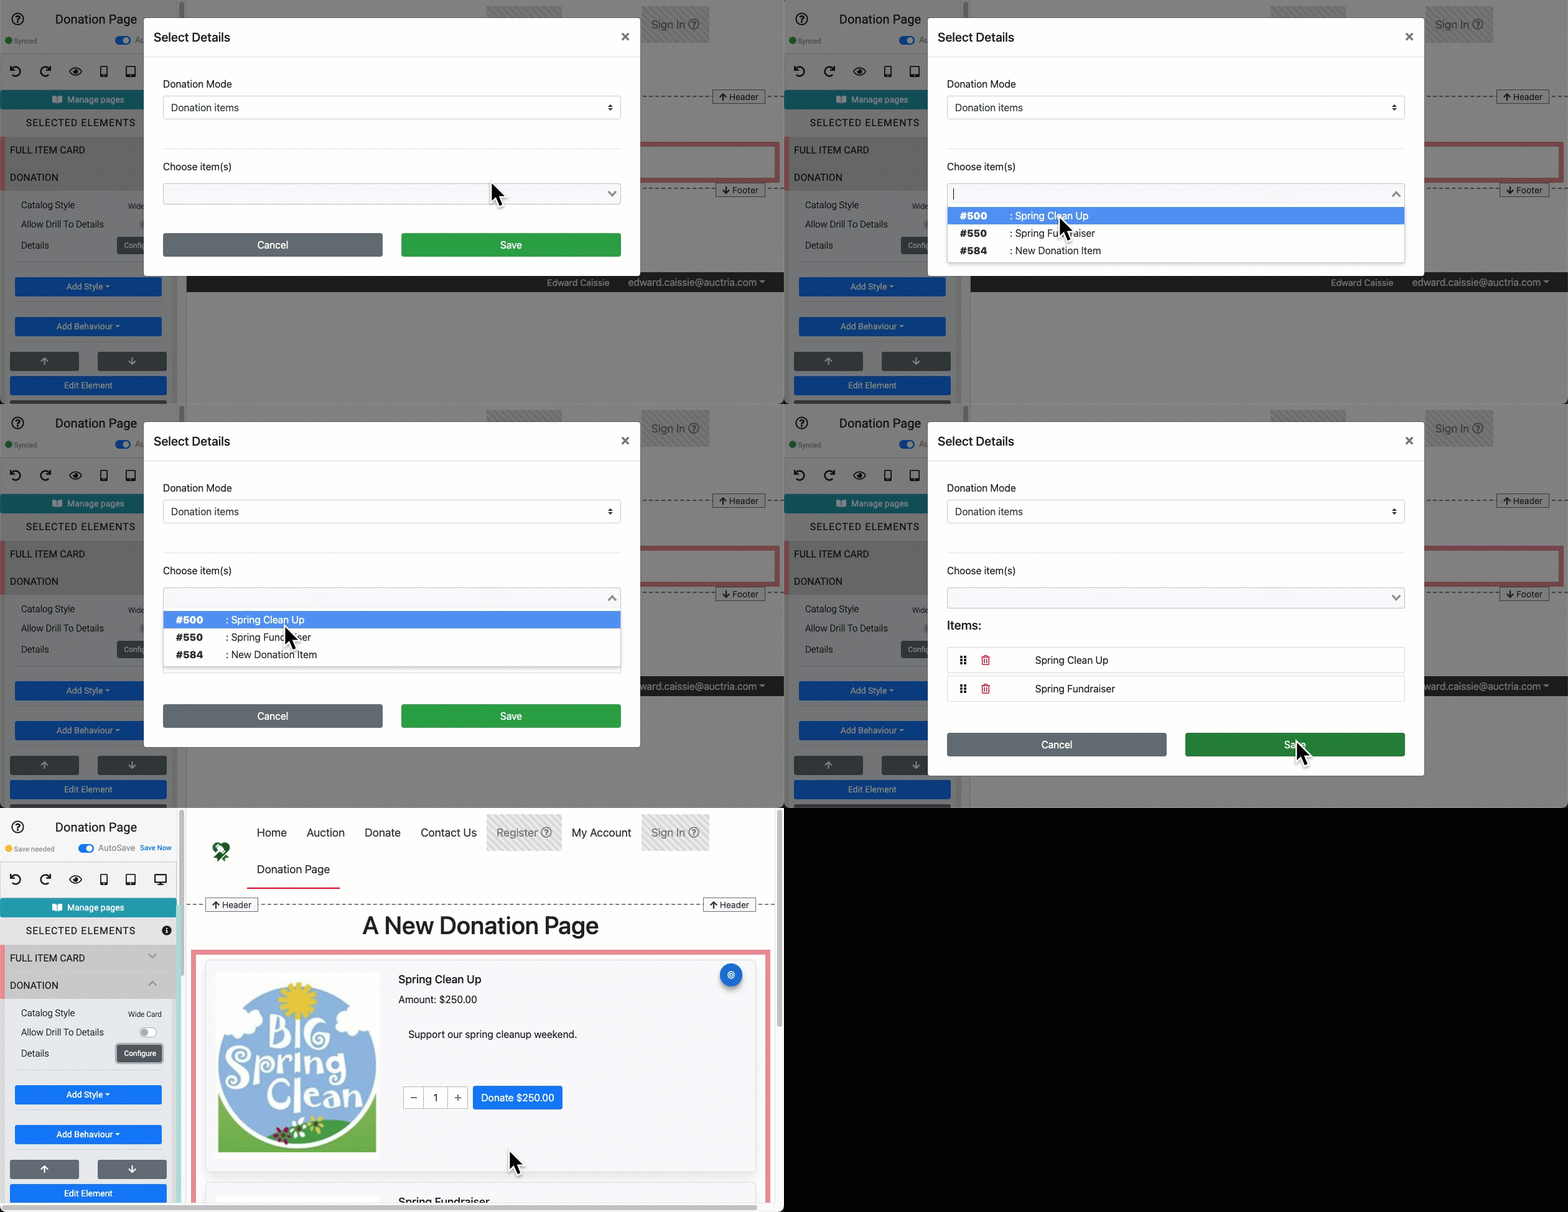
Once you have selected your Donation Items you can click on the "Save" button to add them to the element's display.
If you have an existing Donation Element in Cash Donation Mode, the above can be followed to change the Donation Element to use Donation Item Mode.
You can even add a second Donation Element along side (above or below in reality) an existing Donation Element, there is no restriction on the number of these website elements you can add to your site.
Donation Element | Donation Items Mode

It's important to note that starting with a "blank" page may leave some possible "missing" elements. You might consider some additional content on the page such as a page title, or Heading, some general information about the donation projects not covered in the Donation Item descriptions, and maybe a Progress Tracker sharing how well you are doing.
To add a page title, and keeping in mind you dropped the Donation Element below the existing empty row/column on the page, you can "drag-n-drop" the Heading element into that Empty Column. Once you drop the Heading Element into the empty column it will display with the default text "Heading Text" -- just double-click on the text to open its Edit Text window and change the default to a more appropriate title for the page; click Update when you are finished.
NOTE: Adding a Text Element and/or a Progress Tracker may require you Add A New Row
Donation ItemsHeading
Add New Row
Text Element
Progress Tracker
You're done! Good Job!!
Now, just click on the "eye" icon at the top of the Website Editor Sidebar and have a look at the new "Donation Page" you just created.
Well Done!
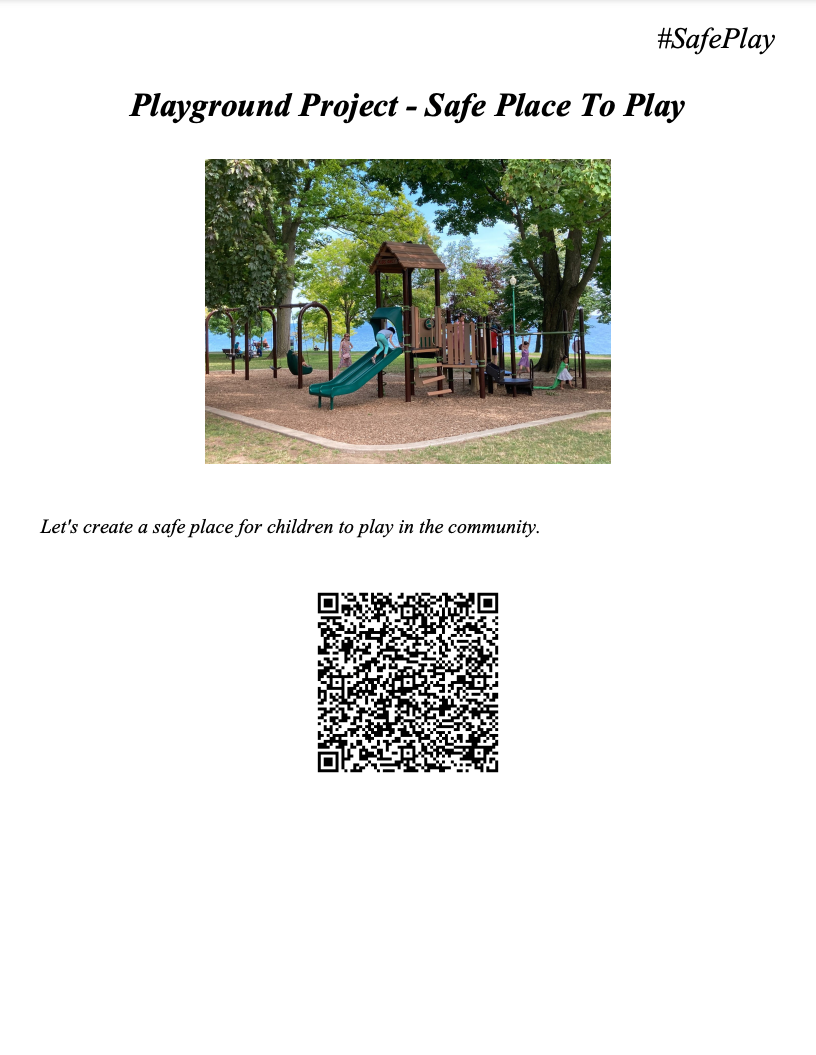
After creating your Donation items and adding your donation page to your auction website, you may want to print out one or more of these items with their QR code for an in-person event or to distribute them as you see fit to help increase the income of your fundraiser. You will use the Printing | Display Pages feature set with its option to include a QR code.
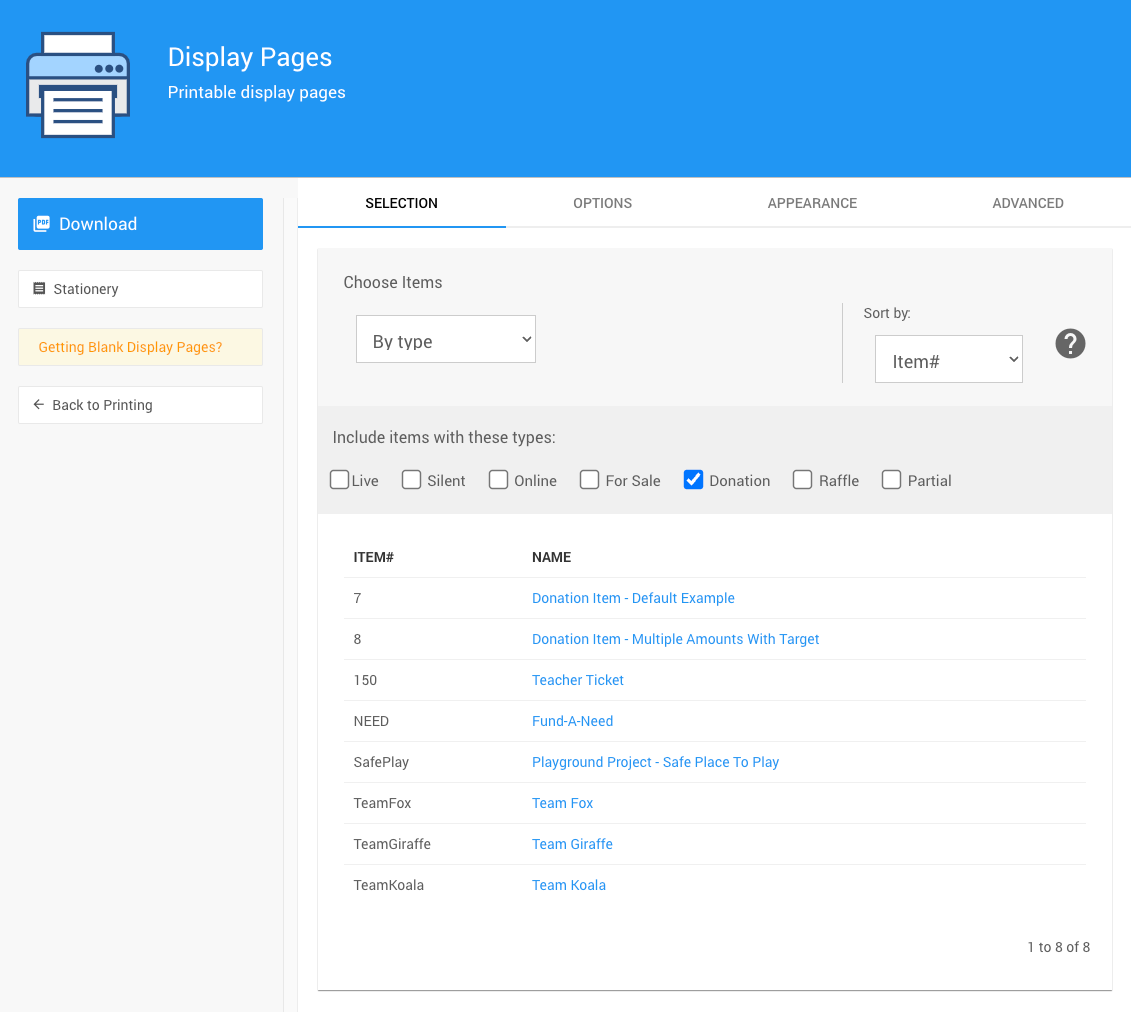
First, you would filter your items selection to only print Donation items.
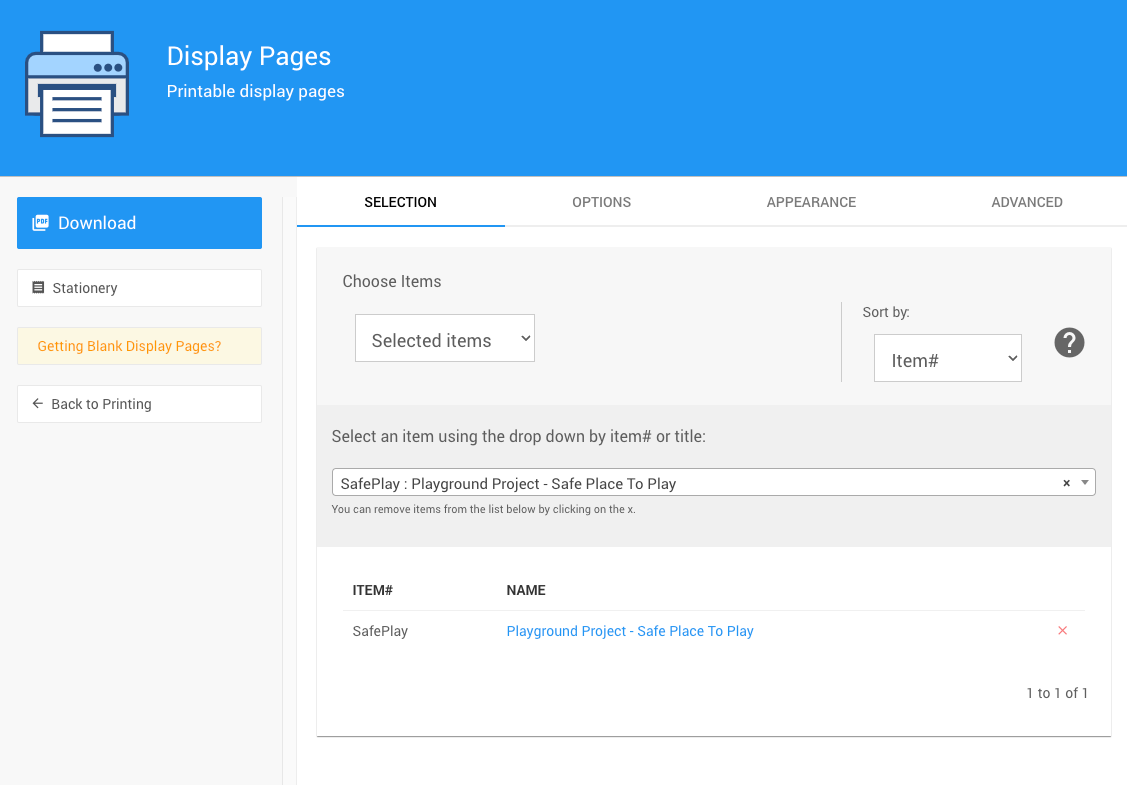
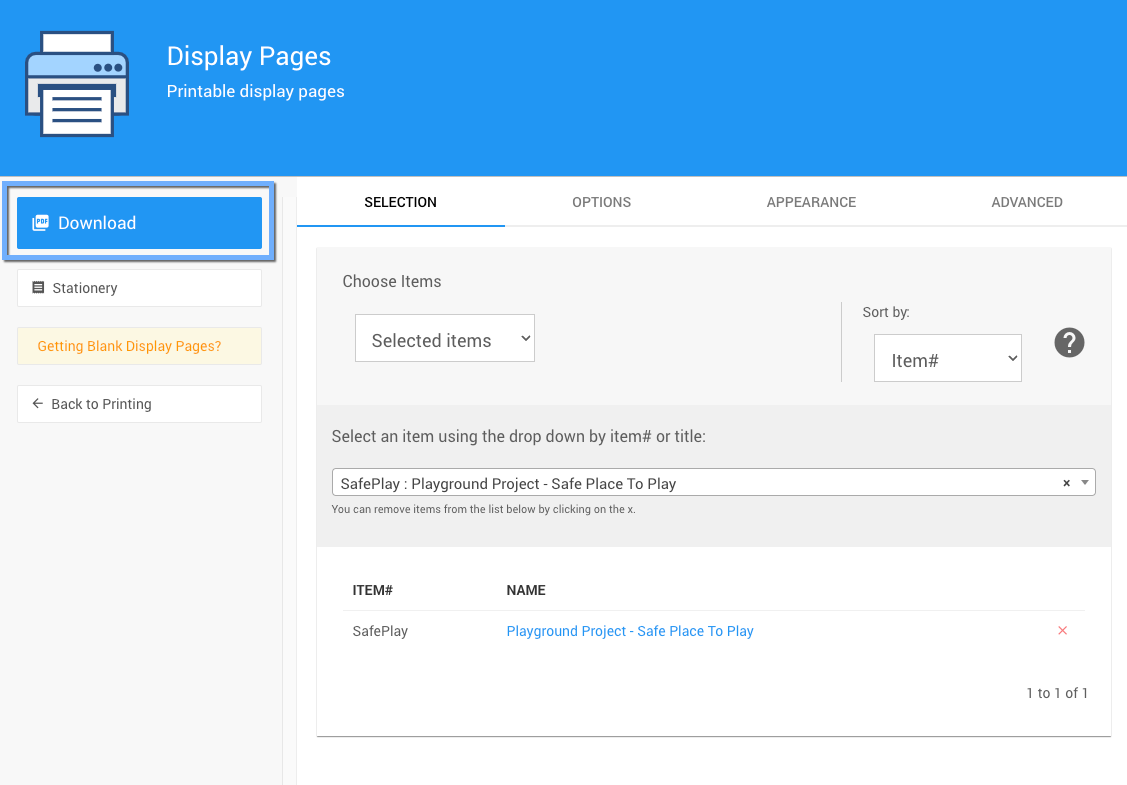
You also have the option to only select a single item, if appropriate, by changing the Choose items filtering function to its Selected items option.
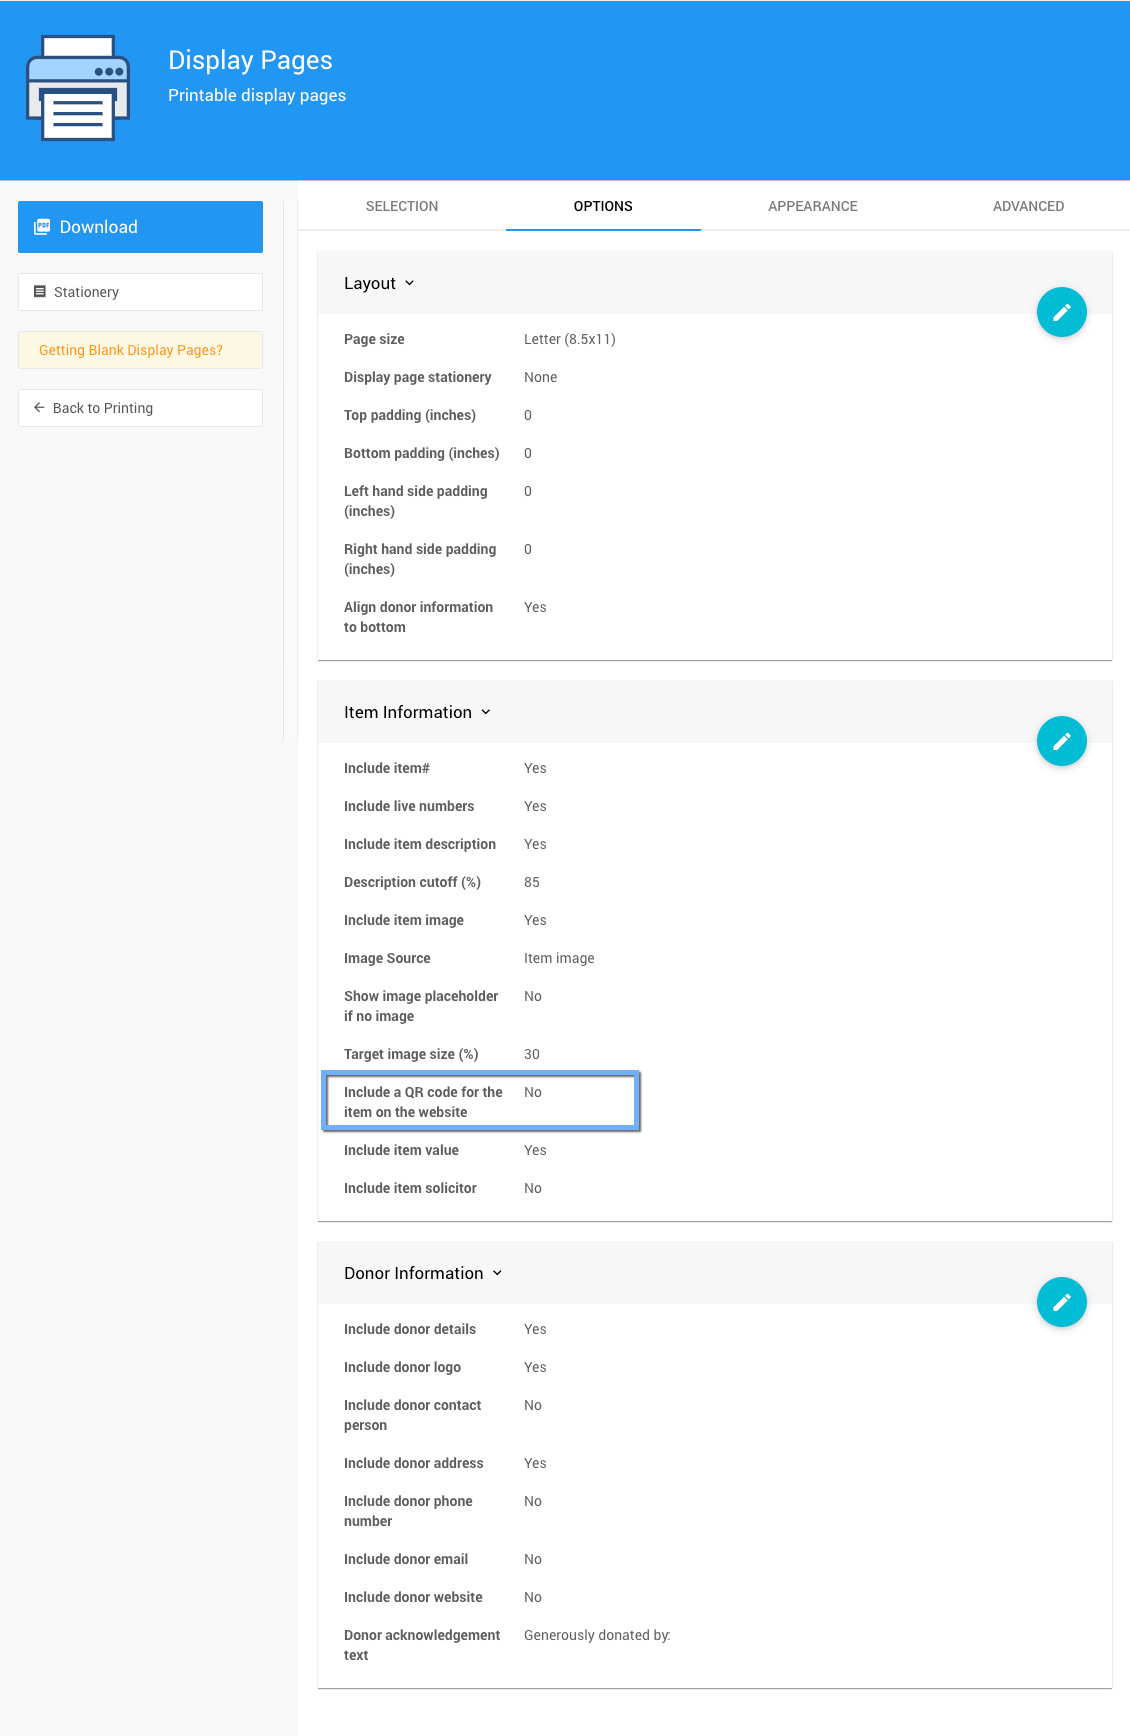
The default Options when printing Display Pages does not include the item's QR code. This option has to be enabled.
Once your options are set for your Display Pages, click the Download button in the sidebar.
This will generate a PDF file and automatically start the download process of a PDF formatted file you can then print or share as needed.
Troubleshooting
- How To Add Cash Donations To Website
Learn how to add a Donation Element to your Event Website to allow guests to make a Cash Donation. - Tracking Online Donations
An overview of how to track donations made via the event website.

Last reviewed: December 2023